For the box you will need:
1 x sheet of DP cut out at 5" x 7" (these are the only measurements I'll have in inches; the rest are in cm's)
Score from each side 4.5cm in.
 Next you will need to cut at each side as shown in the picture below, to form the tabs for the box. I usually cut the width of the score line, so when you assemble the box, it comes together nicely.
 Next you will need to bring each tab to the inside of the box and adhere. I've just used SU Snail adhesive for this. Your box should come together and look like this.
1 x coloured cardstock cut out at 12cm x 26cm
You will then need to score at 10.75cm and 15.25cm. This forms a 4.5cm spine, which is the depth of the box.

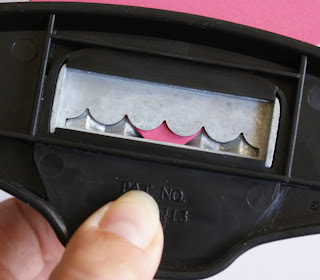
On each corner, I've used the scallop edge punch to create the scallop edge.
 It should look like this!
On the inside of the cover, cut a length of ribbon and adhere to the cardstock, leaving a small length on each side to make a ribbon or knot.
At each end of the cover, I've set a jumbo eyelet with the Crop-o-dile and pulled the ribbon thru to the outside of the cover to finish it off neatly.

Now you are ready to fix the box into the cover. I've put some double sided tape on the base of the box and the side that sits in the spine of the cover. I've used some stronger tape, as you don't want it to fall out.
Your box should sit nicely on top of the ribbon. Here's how it should look at this stage, with the lid open.

And here is the box closed with the ribbon pulled together. I've used a clip from the Hodgepodge hardware. But you could also tie a knot or bow.

You are now ready to decorate the top of the box, however you wish. I've kept it very simple and used some of the left-over cardstock and some felt flowers from my tin of Flower Fusion. I've also stamped the word 'happiness' from Warm Words.

To complete this love note box, I've made up three little love notes from the left-over cardstock, lying all over my table, with some more felt flowers.
You could easily fill this box with small chocolates or some soap.
 So there you have it. If you make one of the these, I'd love to see your creation. And if you have any questions about this project, please email me.
All images © Stampin'Up 1990-2009


3 comments:
Love the note card holder very clever and I love the colours too. thanks for sharing the tutorial.
Liam
hello! good to see you figured out the hyperlink thing! I am going to try and make the box. I have it all cut out and ready to go but have nothing to stick it together with so i might need to source some double sided tape or something - i'll email you pictures when i'm finished it! :)
These cards are just gorgeous Chantelle and so is the little gift box. I am so in LOVE with the Flower Fusion!!
Post a Comment