Thursday 30 July 2009

Scrapbooking - pic of the week

It's not quite the end of the week yet, but here is my pic of the week in a 12x12 scrapbook layout. As I mentioned, the picture was just one of a few that I took on that particular day. So I've included them all in this page as a great memory of Caden and me just playing and having fun together. The larger size pages are always harder to photograph, so I've included some more detailed pictures as well!

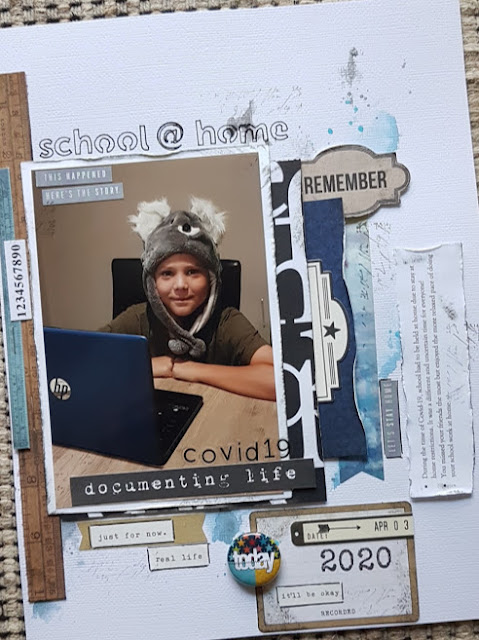
I went with the colours Night of Navy and Taken with Tea, just adding a little white and some spotted DP as a scallop edge border. I've used the Always stamp set for the embellisments. I've also used the Build-a-brad kit for the first time - these are just WOW - I love them. Here I've punched out the flowers from the same stamp set, adhered onto the brad and poped on the clear bubble. Then I've attached to the layout as a set of three!
I've also gone into my stash of miscellaneous supplies and found these two circle tags which I've put along the side - I thought the words really suited the page well.
So another page is done - It's simple, but with lots of photo's, I don't like to add too much, as the photo's really tell the story. See you back next week for a brand new 'pic of the week'


Tuesday 28 July 2009

Pocket Notes Purse - 3D project.

If you haven't made one of these cute little boxes, then you will want to very soon. They are so much fun and very easy to whip up. I was firstly inspired by Kirsty who made one and kindly passed on the link which you can view here for detailed instructions.
They are designed to fit the little love notes but you could also fill them with chocolates or use them as a hostess gift. This one here I made, is as per the instructions and uses the cute Great Friends stamp set which will be out very soon - August 1st - Spring mini.
I've also used some of the Patterns Designer Series Paper in Baja Breeze and Choc Chip.
Here's a close up so you can see in more detail the bellyband!
Once you have mastered this size, it is easy to adapt to another size if you wish. I hope you get to make one of these soon and let me know if you do.

Curtain Call Colour Challenge #1

Curtain Call is the name of Stacey's new colour challenges, combined with an inspiration picture. I love how she has provided the picture as well as picked out the colours. Lots of fun. So here is the first one:
And here is my card. Once again, I've reached for Organic Outlines - this stamp set is seeing lots of ink!!
I've made this a smaller square card. Starting off with a base card of Night of Navy then a layer of Not Quite Navy onto which I've stamped one of the images in the same colour ink.
Then I've added a layer of Whisper White onto which I've stamped the outline image in the Not Quite Navy ink. On a sep. piece of white cardstock, I've stamped up the other image in Night of Navy, cut out and then poped up with dimensionals in front of the other image. I've also done the same with the small flower image in the Not Quite Navy. The picture below gives you a better idea of the layers.
Then I've finished off the card with some blue grograin ribbon and a small sentiment 'wishes' from Expressive Flexible Phrases.
A wonderful first challenge Stacey and I look forward to seeing lots more.

Monday 27 July 2009

Pic of the Week!

I hope you have all had a fantastic weekend. We did, it was super busy and super productive. We are doing lots of work outdoors and also have two birthdays in our family later on in the week, so it's going to be a super busy week as well.

On to the pic of the week - I've chosen this cute picture of Caden reaching out to grab a tennis ball. I LOVE taking pictures of little hands and feet; I was so pleased when I captured this picture; it was just perfect, especially as little hands move rather fast! Another reason I was so pleased was because I used the manual focus and it created great depth-of-field.

This picture was just one that I took on this particular day , so I will be doing up a 12x12 scrapbook page and using some of the other pictures as well. I look forward to sharing that with you later on in the week. Take care...

Friday 24 July 2009

Jewelry Colour Inspiration challenge

Well, it's been a while since I've done one of these challenges. This is Stacey's last jewelry challenge, but she has a new kind of challenge planned, so I can't wait to see what it is. These are the colours she picked out based on a piece of jewelry which you can see here at Stacey's Stampin' Stage.

So for this challenge, I decided to do something a little different and make up a little sampler pack of a new set coming up in the Spring Mini - namely - Just Beachy. It's pretty neat and I think it will make a great set for scrapbooking. So here is my little card sampler pack - I've made three cards to fit into this cellaphane bag with a top-note bag topper!
And here are some pictures of the three cards.
I've used various punches, some retired DP I found in my stash - striped Ruby Red. The sentiments are from Best Yet (hostess set) All the images have been stamped onto Very Vanilla with Black Stazon and I've used the SU markers to colour in.


This will be a cute gift, but for now I'll be using it for my sample box!

Scrapbooking - pic of the week

I'm back on this lovely Friday to show you my 'pic of the week' all scrapbooked! This was a very fun picture to use in a scrapbook layout.
For this 8x8 page I've used the lovely In-Colour from last year - Wild Wasabi - it matched so nicely with his clothes. I've also used some DP from the last years catalogue - the colours are nice and bright! And I've added in some Basic Grey for the base cardstock.
The stamp set I've used is Nursery Necessities and also the matching wheel, Nursery Letters. Wheels are just pefect for scrapbooking and make up great backgrounds for plain cardstock. I've stamped up some of the images in this set - the star and boat - and placed them onto the layout. I've also added some cute buttons and twine to finish it off. I've left a small space up the top to still add some journalling, so I can remember this sweet moment and Caden's first little teeth.
So I'll be back next week with another favourite picture!

Wednesday 22 July 2009

Sketch Challenge from Kellie

I got a few new stamps in the post this week which I ordered from Bizzy Becs and one of them was Gretal - Swiss Pixies made by CC Designs Rubber Stamps. These images are just adorable and great if you love to colour in!
I've used this image with a sketch challenge from Kellie, who is also the inspiration behind the Magnolia Challenges. This is her first sketch challenge, so hop along over and take a peek if you want to join in the fun.
And here is my creations:
I've used some of the Good Morning Sunshine DP and teamed up with Baja Breeze, Pacific Point and Kiwi Kiss - for a change is not pink!
Gretal has been stamped onto White cardstock in Stazon black and I've used my SU markers to colour in. I've applied some glitter to her little wings.
I've placed all the various peices of cardstock as per the sketch. The sentiment is from Great Friend stamp set, a newie coming soon in the Spring Mini. I've poped this up with some dimensionals.
For the embellishments, I've used some half pearls and felt flowers.
Thanks for a great sketch Kellie, I hope to see another one soon.

Tuesday 21 July 2009

Inkspiration Colour Challenge

If you would love to join in with great challenges, go over to Makeesha's website to see a great colour challenge for this week. Here are the colours we had to work with.
And here is my creation with these fabulous colours.
For my card today, I gained inspiration from a card made by Kirsty, at Kirsty's Cards n' Scrapping.
It was this card and her other fabulous creations using this stamp, that made me really want to have it too It's Organic Outline and I just love it.
I've started off with a base card in Always Artichoke, then added a layer of Mellow Moss.
Then onto the Very Vanilla, I've stamped up the two images as shown. Then I've put the cardstock thru my Cuttlebug using the Leaf folder. I've sponged over the cardstock to give some definition to the embossing. I've also paper pierced around the peice of Vanilla cardstock.
I've put a piece of Rose Red cardstock behind this which has been made pretty with the eyelet broder punch.
I've also used the two other images in this set, the sentiment and flower to finish off the card as embellishments. And I've added some Mellow Moss ribbon to finish it off.
Here is a close up so you can see the embossing a little better. Thanks for some great colours Keesh, this was fun!

Monday 20 July 2009

Pic of the Week!

It's time for another 'pic of the week'. I've chosen this one of my very cute baby boy,Caden, who is nearly one already. This was taken back in May when he just got his first two little teeth. I was sitting on my knees and he came crawling up to me, wanting to grab my camera. Before he managed to do that, I captured his cute expression and little teeth.

I look forward to showing you a scrapbook page later on in the week.

Sunday 19 July 2009

Magnolia Down Under Challenge #18

The next challenge is up at Magnolia Down Under. The theme is Christmas in July and this is my second card as guest design team member. I'm having a wonderful time. I was a little worried at first when I saw the word Christmas and realized I didn't have a specific Tilda for the occasion. But I did have this sweet Tilda with Envelope, so I've used her. She is off to post a Christmas card! So by doing this, you can see you don't have to own a Christmas Tilda to be part of the challenge.

I've used traditional Christmas colours: Riding Hood Red and Old Olive, teamed up with some Very Vanilla and Dashing DP.
I've also used Season of Joy stamp set for the tag and background behind Tilda. The image has been stamped in Black Stazon and I've coloured with my SU markers.
I've used some wide grosgrain ribbon to make a big bow and tie off with a red button. And to pretty it up just a little, I've added a border with the Eyelet border punch.
So there you have it; I hope it gives you a little inspiration for the Magnolia stamps and that you will join in the fun as well. Check out all the other fabulous creations from the Design Team - they are all amazing.

Saturday 18 July 2009

Sketch challenge

I'm on a roll with the sketch challenges from Amy at Prairie Paper & Ink. I love her sketches, especially with the circles. Here is the sketch for this week:
And here is my creation for the sketch:

I've started with a base card of Rose Red, then layered some Pretty in Pink cardstock. For the other layers as per the sketch, I've used paper from Rasberry Tart - one of my favs. I've also added a strip of Kiwi Kiss which has been prettied up with the Eyelet border punch. Another fav of mine!!
For the main image, I've used the butterfly from Garden Whimsy. It's firstly inked up in the Pink and then the edges have been rolled into the Rose Red. I've used my CM circle cutters to create the circles.
I've added some stitched ribbon in pink and tied it in a bow. I'm just loving bows at the moment.
The sentiment 'friend' is from a new set in the Spring Mini. I've used the Rose Red marker pen to colour the word 'friend', then used an oval punch.
So there you have it, simple but sweet. Thanks for another great sketch Amy.
Product used:
Stamp set: Garden Whimsy, Great Friend.
Cardstock: Rose Red, Pretty in Pink, Kiwi Kiss, DP Rasberry Tart, Whisper White
Ink: Rose Red, Pretty in Pink
Accessories: Eyelet border punch, Ribbon, CM cutters, Oval punch

Scrapbooking - pic of the week

Here is my 'pic of the week' in a scrapbook layout. This is an 8x8 size layout; such a fun size to work with, especially if you have just one photo!


I've used the colours from our clothes to decide on the colour combo: Almost Amethyst, Lovely Lilac and Basic Black. I hardly ever use purple colours, so this was a nice change.
I'm giving you a sneak peak at some new stamps from the Spring Mini (1st Aug) - the leaf and butterfly image. They are just beautiful.
I've used the leaf image on the Lilac to stamp up a background. Onto the strip of Whisper White, I've used the Friendly Words wheel inked up in Amethyst. I got some new ribbon yesterday, which I picked up from a local store - here I've used the black stitched ribbon and I managed to tie it into a bow, then finished off with a half pearl.
For the butterfly, I've inked up in Amethyst, then rolled the edges into Lilac. Then with my SU marker pen in Sage Shadow, I've applied some ink to the leafy parts.
I've completed the page with some purple brads. It's quite a simple page, but I'm really pleased with it.

Early next week, I'll be back with another favourite pic!

Thursday 16 July 2009

Pink Elephant.

The Pink Elephant is another wonderful place to go for a challenge. This week it is a colour challenge: Red, Light Blue & Darker Blue. Pop on over and have a look......
And here is my creation - I've chosen Riding Hood Red, Baja Breeze and Pacific Point - all our In-Colours and a little more boyish for a change!
I've used Party Hearty stamp set for my card. And once again I've gone with some of the lovely Patterns Designer Series Papers in Pacific Point and Riding Hood Red. Ever since my paper share, I can't stop using them. I've added a few brads and some striped Pacific Point ribbon and also used the scallop edge punch.
A simple but fun card!
Products used:
Stamp set: Party Hearty
Cardstock: Riding Hood Red, Pacific Point, Baja Breeze, Whisper White, Designer Series Papers
Ink: Baja Breeze, Riding Hood Red, Pacific Point
Accessories: Scallop punch, Brads, Ribbon, Window punch, Cutter kit.

Wednesday 15 July 2009

Sketch challenge

Over at Prairie Paper & Ink there are weekly sketches to do. Amy always comes up with fabulous challenges and I love it when there are circle images. Here is this weeks sketch challenge:
And there is my take on the sketch.
I've used Riding Hood Red, Pumpkin Pie and Baja Breeze as my colour combo. And I've used three different DP in these colours for each layer.
The stamped image is from A Kind Word - the two girl images in these set are just adorable - perfect for colouring. I've used my SU markers to do this and also added some paper piecing to the dress. The sentiment is from the same set and I've finished the card with some tafetta ribbon in Riding Hood Red.
Such a fun sketch and I'm sure I'll be using it again soon.

Product used:
Stamp set: A kind word
Cardstock: Riding Hood Red, Baja Breeze, Whisper White, Designer paper
Ink: Riding Hood Red, Baja Breeze
Accessories: Circle punch, Corner rounder, SU markers, tafetta ribbon, CM circle cutters.

Monday 13 July 2009

Pic of the Week!

I'm introducing a new concept to my blog! I LOVE scrapbooking and don't get the chance to complete as many layouts as I would love to do. So I thought if I make a commitment to doing at least one layout each week, I would be getting somewhere. At the beginning of each week, I'm going to show you a favourite 'pic' that I've taken - this will also share a little about me and my family life - and then later on in the week, I will show you the 'pic' in a scrapbook layout. I hope to alternate between 8x8" and 12x12" pages, use sketch challenges, colour challenges and also other techniques. So here is my first 'pic'.

"Pic of the Week"

Yesterday, I had a lovely visit from a very dear friend who I've known and kept in touch with for over 15 years. I met her when I made a trip over to Canada in August of 1994. Since then we've kept in touch via emails and letters. Her name is Lisa and she came to visit yesterday with her family. They are having a holiday in Australia and visiting all their many relatives who live here. So it was very special that she made the time to come and visit me.
I hope you will come back later in the week to see what I've created for this special photo.

Wednesday 8 July 2009

Mojo Monday #94

I always love seeing what the sketch is for Mojo Monday but don't often have the chance to stamp up a card for it. So when this weeks sketch poped up in my Inbox, I decided to give it a go. Here is the fabulous sketch we had to work with - quite a few different layers!
And here's my creation!


I've used a stamp set that hasn't seen some ink in a while, Priceless. I've used the Sweet Always DP and teamed up the colours - Pretty in Pink, Regal Rose, Choc Chip and Pumpkin Pie. You can't really go wrong with this kind of colour combination.
So I've layered the various pieces of cardstock according to the sketch. For the main image, I've stamped up two butterflies in Rose and Pumpkin, cut them out and then poped up with dimensionals. I've sparkled them up with some glitter. The circle embellishment is also similar and I've added one of the Designer brads to the centre.
I'm quite pleased with the end result - a very pink girly card - another to add to my collection.
Product used:
Stamp set: Priceless
Cardstock: Pretty in Pink, Regal Rose, Choc Chip, Pumpkin Pie, Whisper White,
Ink: Pretty in Pink, Pumpkin Pie, Choc Chip
Accessories: Circle punches, Dimensionals, Designer series brads

Just 'Jewel'

I love this cute stamp of 'Jewel' by Bizzy Bec. I had coloured her in the other week and decided to put her on a card. So using no particular sketch or colour inspiration, I whipped up this one!
I've started off with a base card in Pink Pirouette, then added a layer of the Designer Series Paper in the Pirouette, which I've paper pierced around the edges. I just did a paper share with all these lovely papers and it is just so nice to have all of the colours on hand!
I've stamped 'Jewel' onto some white cardstock in the Stazon Black and have used my SU marker pens to colour. She has some glittery bits on her belt, buttons and hair. Too cute!!
Then I've layered the stamped image onto Ballet Blue and Regal Rose. I've used the Eyelet border punch to add a strip to the side of the image.
The sentiment is from Best Yet (hostess set) and I've used the circle punch and label punch to layer it. I've also used on the the brads from the Silver Hodgepodge hardware.
To finish off the card, I've used some wide striped ribbon in Pink Pirouette.

Product used:
Stamp sets: Best Yet, Tilda - Bizzy Becs
Cardstock: Pink Pirouette, Pretty in Pink, Ballet Blue, Regal Rose, White (non-SU)
Ink: Ballet Blue, Regal Rose
Accessories: SU marker pens, glitter, Circle punch, Label punch, ribbon, Eyelet border punch, Mat pack, dimensionals.

Sunday 5 July 2009

Magnolia Down Under Challenge #17 as guest Designer

The challenge over at Magnolia Down Under is up to #17 and as the title reads, I'm a guest design team member for July and August. I'm just delighted to be a part of this and I know I will very much enjoy contributing to the challenges every two weeks. Thanks for the opportunity Kellie!
So challenge #17 is a sketch challenge, the first one so far and a great one at that!
I made two cards with this sketch - the second one is up on the Magnolia Down Under blog.
Check out the link and see all the other fabulous cards from the other design team members. They have all done a wonderful job with the sketch.

Wednesday 1 July 2009

Inkspiration Colour Challenge

Here's another Inkspiration Challenge... this week it's a colour challenge. Keesh always picks great colours to work with and this week was no exception. So here are the colours:
And here's my creation. I've done something a little different this week. I have my Oma's birthday at the end of this week so I wanted to make a little gift for her, coz I know she loves home-made creations. So using the above colours, I've made up three cards with a plastic sleeve bag to hold them in.
The cards all have the same layout, just some different colours in ribbon and the sentiment. I had a few new goodies in the post this week, namely the eyelet border punch - makes the card so pretty without much effort at all; and the Organic Outline stamp set. I never really thought much of this set at all, but after seeing heaps of creations by lots of clever stamps out there, it won me over and I just had to have it! I think it's going to be one of my favs.


Here's a closer look at one of the cards. If you're wondering about the ribbon.... I've used my marker pen to colour in a piece of white tafetta, so it's now Ruby Red. I did the same for the Basic Gray ribbon, just used a sponge dauber and ink pad.
And here is the trio of cards all packaged up. The plastic sleeve I've used is actually a file insert - I've just cut off with while strip with the perforated holes and I've also cut off some length to suit my project. Then I've lined it with a piece of DP in Baja Breeze, used the window punch thru all the layers and tied off with some Baja Breeze ribbon.
Products used:
Stamp set: Organic Outine
Cardstock: Ruby Red, Baja Breeze, Basic Grey, Whisper White, Designer Series paper Baja Breeze.
Ink: Basic Grey, Baja Breeze
Accessories: Eyelet border punch, Oval punch, Label punch, Window punch, Ribbon, brads, dimensionals, plastic sleeve.

school @ home

Hello, I definitely wanted to record this little moment!  School @ home due to stay at home restrictions because of COVID-19.  It was certai...