Thursday 26 February 2009

Winter Retreat DP

Well, since the lovely Stacey from Stacey's Stampin' Stage sent to me the Winter Retreat DP and DieCut stickers, I decided to use them right away for some scrapbooking. This photo of the three boys was perfect to use and had just the right colours. I haven't added too much to this page, as the DP is fairly bold, but fun. I had to add the snail image to make it look a little 'boyish'.


Product List:
Stamp set: Garden Whimsy, Big Deal Alphabet
Cardstock: Brocade Blue, Old Olive, Whisper White, Winter Retreat DP
Ink: Brocade Blue, Old Olive, Whisper White craft ink
Accessories: Wide grosgrain ribbon, Circle punches, Paper peircer


Jewelry Colour Inspiration Challenge

The colour challenge for this week at Stacey's Stampin' Stage was inspired by this peice of of jewelry. It's such a pretty little pendant for a necklace and I love it alot. The colours are: Briliant Blue, Kiwi Kiss (i've used Old Olive), Lovely Lilac and Whisper White.; not colours I would normally use, so that's why I had to have a go.

I have once again gone with a very simple design and started off with a white base card. I've scored a single line at the top and bottom of card and added some paper piercing. Next I've added some Olive and Lilac cardstock and used the paisley stamp from Petals & Paisley for the Olive cardstock. I've also glued some small pearls to the paisley print! The wonderful sentiment is from Warm Words. And the flower is from Winter Retreat DP and Diecut Stickers which I received from Stacey a few weeks ago as blog candy. It was the perfect flower for this card. I added a Brilliant Blue button and some twine to the centre of the flower.


Monday 23 February 2009

Ocean Commotion

It's that time of year when we anticipate the new Stampin'Up ® catalogue. What's going out and what's coming in?? I really hope this set from the current summer mini, Ocean Commotion, does appear in the new catalogue. I've really enjoyed this simple set of four images, both for cards and scrapbooking. Here's one I've made today that I thought I'd share, seeing as I haven't shared a whole lot lately!!


I've started with a base card of Soft Sky onto which I've layered Not Quite Navy, Old Olive & DP Spring Silhoutte cardstock. Some of the edges have been torn. Along the spine, I've tied some twine! One fish image has been stamped onto the base card in Soft Sky, and the other two fish have been stamped onto Whisper White, cut out and then mounted with dimensionals. Above the fish, I've embossed with the cropodile, to create air bubbles and then dotted with crystal effects, to give them a raised look. I've also run the glue pen along the fish and sprinkled with glitter. Lastly, I've finished off the card with a sentiment from Short & Sweet.
All images © Stampin'Up 1990-2009

Saturday 14 February 2009

Thursday 12 February 2009

Weekly challenges with Makeesha

Makeesha's challenge for this week is to work with these colours. You can find the details here if you want to join in with the fun.
I'm loving sweet and simple cards at the moment, so here is another. I've used the Sale-a-bration stamp set Botanical Blooms.


Card Recipe:
Stamp set: Botanical Blooms
Cardstock: Whisper White, Sage Shadow, Regal Rose, Rose Red, Watercolour paper
Ink: Stazon Black, Regal Rose, Rose Red
Accessories: Wide grosgrain ribbon, paper piercer, cutter kit for distressing, aqua painter
All images © Stampin'Up 1990-2009


I've also made up a 12x12 scrapbook layout. I've used some photo's of Caden and me and it sure was good using some girly colours for a change! I really enjoyed this one.

Recipe:
Stamp set: Scribble This, Scribble Stampin' round wheel, Headline Alphabet (retired)
Cardstock: Whisper White textured, Sage Shadow, Rose Red, Regal Rose, Rose Red DP
Ink: Sage Shadow, Regal Rose
Accessories: Scallop edge punch, paper piercer, ribbon, rub-ons, circle cutter (CM), half pearl
All images © Stampin'Up 1990-2009


Tuesday 10 February 2009

Scrapbooking 12x12

Well, I promised you some scrapbook pages in 12x12. I haven't used this size layout for a long time, but I really enjoyed it. When I take my photo's, it's usually more than one in the same sitting. Sometimes it's hard to just pick one photo, so doing 12x12 layouts, allows me to have a few photo's of the same subject. It's pleasing to the eye when the photo's are similar, with the same theme and colours. And it makes designing your page layout and colour choice a whole lot easier as well.

This first layout is of my very photogenic son, Kyle. I've used Designer Paper Jersery Shore and worked with those colours: Wild Wasabi and Brilliant Blue.
The chipboard letter 'u' has been covered with the same DP. Tip: First cover your entire piece of chipboard with glue - I've used the Tombow liquid glue - cover the chipboard with your selected paper and press down to adhere the glue; then cut paper fairly close to the edge of the letter. Using a piece of sandpaper, sand away the excess edges. This will make very neat and finished off edges. I've used the Life's Definitions stamp set 'unique' underneath.


These next two layouts are fairly similar in design, as they will sit side by side in the album and feature Tyson & Liam at the Quindalup Farm during the summer school holidays. The colours are similar as well: Choc Chip, Close to Cocoa, Old Olive and Ruby Red. Because all the photo's are similar in colour, it's easy to choose colours that compliment, without over doing it and taking the attention away from the pictures.
I've used the Tidy Alphabet (retired) for their names and a few simple embellishments to finish off the page. The wider ribbon is perfect for scrapbook pages.


All images © Stampin'Up 1990-2009


Saturday 7 February 2009

Jewelry Colour Inspiration Challenge

Here's another challenge from Stacey's Stampin Stage.
After joining in with the last one (which I actually won), I've been really wanting to join in with another. So this weeks colours are Choc Chip, Cameo Coral, White and Silver/Grey. A great colour combo and a lovely piece of jewelry.
And here is my card. It's a really simple one, but I just love how it's turned out.
The base card is Whisper White to which I've used the scallop edge punch along the top. Tip: To ensure that the scallops line up when the card is closed, score the A5 card in half and then line up the punch with the centre of the cardstock, along the score line. The scallop edge punch has a guide notch just below the Stampin'Up symbol. From here you can punch out on either side until you reach the end of the cardstock.
Then I've used some choc chip and cameo coral cardstock and tied off some choc chip ribbon across the coral cardstock.
The stamped image is from Embrace Life. I've stamped the image onto watercolour paper with Basic Brown ink and coloured in with ink pad and aqua painter. Then I've hi-lighted some bits with the white gel pen. I've roughen the edges using the cutter kit and then matted onto some more watercolour paper to give it a framed look. I just love the elegance of this. I've added some silver brads and stamped the sentiment in Basic Brown ink.


Card Recipe:
Stamp: Embrace Life
Cardstock: Whisper White, Choc Chip, Cameo Coral, Watercolour paper
Ink: Basic Brown
Accessories: Grosgrain ribbon, Silver brads, Aqua painter, Cutter kit (SU), Scallop edge punch

All images © Stampin'Up 1990-2009


Thursday 5 February 2009

Love note card holder or gift box

I have been blog surfing and came across this cute little box which you can view here. I liked it so much, that I made one for myself. I'm not sure what the measurements and details were, so I've made a little tutorial of how I created mine. Enjoy!

For the box you will need:
1 x sheet of DP cut out at 5" x 7" (these are the only measurements I'll have in inches; the rest are in cm's)
Score from each side 4.5cm in.

Next you will need to cut at each side as shown in the picture below, to form the tabs for the box. I usually cut the width of the score line, so when you assemble the box, it comes together nicely.
Next you will need to bring each tab to the inside of the box and adhere. I've just used SU Snail adhesive for this. Your box should come together and look like this.

Now you are ready to make the cover for the box. For this you will need:
1 x coloured cardstock cut out at 12cm x 26cm
You will then need to score at 10.75cm and 15.25cm. This forms a 4.5cm spine, which is the depth of the box.

On each corner, I've used the scallop edge punch to create the scallop edge.

It should look like this!

On the inside of the cover, cut a length of ribbon and adhere to the cardstock, leaving a small length on each side to make a ribbon or knot.
At each end of the cover, I've set a jumbo eyelet with the Crop-o-dile and pulled the ribbon thru to the outside of the cover to finish it off neatly.

Here you can see the ribbon come thru to the outside of the cover.


Now you are ready to fix the box into the cover. I've put some double sided tape on the base of the box and the side that sits in the spine of the cover. I've used some stronger tape, as you don't want it to fall out.
Your box should sit nicely on top of the ribbon. Here's how it should look at this stage, with the lid open.


And here is the box closed with the ribbon pulled together. I've used a clip from the Hodgepodge hardware. But you could also tie a knot or bow.


You are now ready to decorate the top of the box, however you wish. I've kept it very simple and used some of the left-over cardstock and some felt flowers from my tin of Flower Fusion. I've also stamped the word 'happiness' from Warm Words.


Here's a little close up.


To complete this love note box, I've made up three little love notes from the left-over cardstock, lying all over my table, with some more felt flowers.
You could easily fill this box with small chocolates or some soap.

So there you have it. If you make one of the these, I'd love to see your creation. And if you have any questions about this project, please email me.
All images © Stampin'Up 1990-2009

Winner..........

Thanks to all those who left a comment for the Flower Fusion giveaway. I enjoyed reading them and getting to know what you all love using your Stampin'Up products for. Alot of you love scrapbooking, so I'm planning on showing more scrapbook layouts, also in different sizes. And of course there will be more cards. I've also got a little tutorial coming up for a 'love note' box. So please stay with me.

And the winner is Sarah. I know she often looks at my blog and leaves me lovely comments. So Sarah, please send me an email with your address and I'll arrange to send the tin out to you.

Tuesday 3 February 2009

Makeesha's Sketch Challenge #4

After school holiday fun and seeing the kids back at school, it was nice to be able to get back into some Stampin' fun of my own. It feels like ages since I've stamped!! So I've started with one of Keesha's sketch challenges. Here is the sketch we had to work with. I actually found this one a little harder than I thought it would be; I think it had something to do with the little strip going across. But it was fun and I'm happy with my creations.
http://www.makeeshabyl.com.au/index.php/2009/01/30/inkspirations-sketch-challenge-4/


First up, a little 6x6 scrapbook page with a photo of my little Caden, at only a few days old. He's not so little anymore; nearly six months old already.
I've stamped up the base of Soft Sky with the heart stamp from the Sale-a-brations set Polka Dot Punches. I've used the 'star' image from Nursery Necessities which has been stamped onto Whisper White with the Wild Wasabi and then clear embossed. Tip: First ink up the image in the Versamark, then into the Wild Wasabi. Press image onto white cardstock and then sprinkle with clear embossing powder. The versamark allows you to emboss and have any colour you wish.
I've cut out the star image and mounted with dimensionals and added two little silver star brads from the Styled Silver hardware. Then I've completed the sketch with the striped ribbon in the Bashful Blue.
These 6x6 pages are so easy to whip up, especially when you have a sketch to work with.


For my card, I really wanted to use a stamp set I hadn't used in a while. I picked Time well spent, which is a hostess stamp.
The base of the card is Guava which I've stamped a BG using the Tres Chic. Then I've layered with Soft Sky and Pretty in Pink cardstock. Onto the pink, I've used the Fine Lace BG stamp. Both the flower and butterfly images have been stamped onto Whisper White, coloured lightly with aqua painter and ink pads. I've added some glitter to the butterfly. The sentiment has been stamped in Soft Sky and coloured in with the same colour ink. Lastly I've added three half pearls to complete the card.
I'm happy with the end result, I think it's a pretty card, but it's not normally the style of card I would make. But, that's the fun of sketch challenges; it allows you to come up with something different. If you want to join in, be sure to check out Makeesha's website for all the details.


All images © Stampin'Up 1990-2009

school @ home

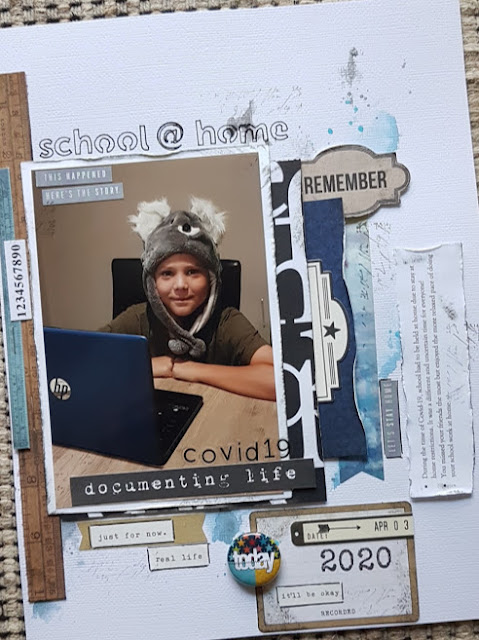
Hello, I definitely wanted to record this little moment!  School @ home due to stay at home restrictions because of COVID-19.  It was certai...