Tuesday 29 July 2008

Just a few challenges.....

I've had a great relaxing day, spending most of my time in my craft room. After doing heaps of housework etc yesterday, I knew today I would have to take it easy - so that's what I did. And it's def. the weather for being indoors and staying warm!

Just wanted to share some cards and scrapbook pages I've been working on since last week.

These first four are from a colour challenge set out at the Aussie Demo group I'm with:
Blue Bayou, Sage Shadow, Pumpkin Pie & Whisper White. I must say I really enjoyed this colour combo.

The first card is a cute square one, using an image from Fishy Friends. I've used my SU markers to do some watercolouring.
This is a pocket card, very simple but using some of my favourite sets - Wild about You & Wonderful Favourites.

And two 8x8 scrapbook pages. I've started an 8x8 album, as this is my favourite size to work with. The plan is to just use random photo's and hopefully get some from other people, so I can have a variety of samples to show using Stampin'Up products. It's always nice to have different pictures to work with. As much as I love scrapbooking my family, it always seems to be with the colour blue!! Maybe that will change soon........


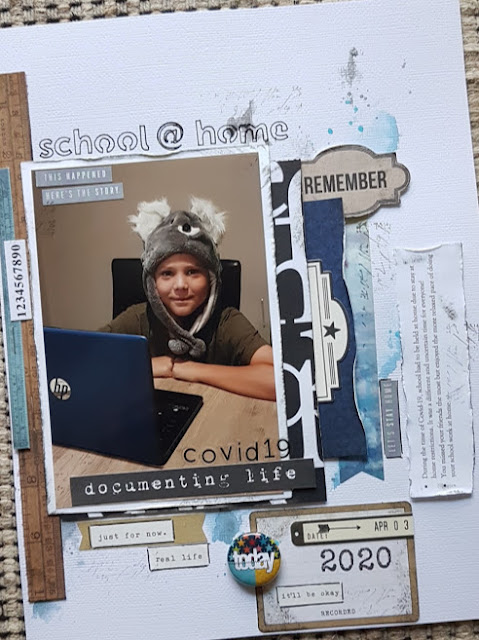
This last layout is for a challenge over at Aussie Scrapbooking. If you love scrapbooking, this is a great site to have a look at for inspiration and challenges to be involved in. This challenge had the theme: Always on my Mind. So this is what I came up with. It's a 12x12 size and rather hard to photograph - looks so much better IRL. But you get the idea. Most products are Stampin'Up but I've gone into my stash and used a few other embellishments as well. All fun!!

That's all for now.....

All images © Stampin'Up 1990-2008

Friday 25 July 2008

.... a strawberry dipped in chocolate sauce..... mmmm

Another little 'love note' card and I've used the strawberry stamp from Tart & Tangy (Spring mini catalogue). It's amazing what creations you can come up with, from just four little stamps. Def. a great set to have!!


Card Recipe:
Stamp: Tart & Tangy, Family Phrases (sentiment)
Cardstock: Whisper White, Old Olive, Choc Chip, Rose Red, DP Rose Red
Ink: Whisper White
Accessories: Circle punches, Scallop punch, Choc wide grosgrain ribbon, marker pens, dimensional magic, mat pack, white gel pen.
All images © Stampin'Up 1990-2008

Thursday 24 July 2008

Colour Challenge - K Werner Designs

It's that time again, another colour inspiration challenge. Not sure if I would wear this dress, but these colours are nice, especially for florals. Rose Red, Regal Rose, Sage Shadow & Whisper White.
And here is my card. Have kept this one quite simple and used some of the Pretties Kit and the lovely wide grosgrain ribbon.


Card Recipe:

Stamps: Scribble (Stampin' wheel), So many sayings (sentiment)

Cardstock: Regal Rose, Sage Shadow, Rose Red, Whisper White

Ink: Whisper White, Sage Shadow

Accessories: Pretties Kit, Wide grosgrain ribbon, Corner rounder

All images © Stampin'Up 1990-2008

Wednesday 23 July 2008

Pictures of us!!

It's rainy and wintry down here in Busso. So we had some indoor fun with the camera!!
I don't get many pictures of Kyle. He is so photogenic; love this natural pose.
A hand from each of the boys on my tummy.
And a fun pose from all three, all giving me their cheeky grins.

Tuesday 22 July 2008

Sketch Challenge

One more challenge that I joined in with; a sketch challenge also from Keesh. My desk is very messy at the moment, different coloured cardstock all over the place. I challenged myself to use the cardstock that was on my craft table and these are the colours I came up with: Not quite Navy, Old Olive & River Rock.


Card Recipe:

Stamps: Polka Dots & Petals, It's all Good (circle sentiment) Oh So Lovely (hostess set)
Cardstock: Navy, Olive, River Rock & Whisper White
Ink: Black Stazon, River Rock
Accessories: Circle punches, Ribbon, Mat Pack, Dimensional Magic

All images © Stampin'Up 1990-2008

Makeesha's colour inspiration challenge

If you go over to Makeesha's blog, you will see one of her challenges, a colour inspiration challenge. Purely Pomegrante, Certain Celery, Choc Chip & Pretty in Pink. I love these colours, so just had to give it a go.

On the base card of Pomegrante, I've stamped the butterfly stamp from Time Well Spent (hostess set). Then I've layered strips of Celery and Choc chip. I've punched out square from Berry Bliss paper and mounted onto Pomegranate squares. The SU square punches are the best!! I've used a chipboard accent, sponged in Pomegrante ink and put a half pearl in the centre and glossed it with Dimensional Magic. And then tied some Celery ribbon to complete the card. The sentiment is from Short & Sweet.
All images © Stampin'Up 1990-2008

Friday 18 July 2008

Box in a Bag

When I saw this 'Box in a Bag' on Carol's blog http://cardsmore.blogspot.com/ I knew I wanted to try it out for myself. Carol was kind enough to pass on the link to where I could find the tutorial. Let me tell you, it's a very cute little bag to make and looks even better in real life. A great little gift bag to fill with something sweet!!

So here's my creation. I've used DP from Fall Flowers with Blue Bayou cardstock. The stamped image is from True Friend.

Here is the link to the tutorial: http://dianagibbs.typepad.com/stampin_with_di/2008/06/box-in-a-bag-tutorial.html

The measurements are all inches so I'll list the cardstock required in cm and then you can follow the tutorial. It's very easy to work out and once assembled, you can decorate however you wish.

Materials you will need:

1 x cardstock 11.5cm x 11.5cm for box base
1 x Designer paper 14cm x 28cm for bag
1 x strip of cardstock 5cm x 28cm to create scallop edge.

You will need to score cardstock for box base at 2.5cm from each side.

Let me know if you give this one a go, I'd love to see what you come up with. And if you need any help, just leave a comment. Ok, I'm off to make some more.


All images © Stampin'Up 1990-2008

Colour Challenge - K Werner Designs

I missed doing the last colour challenge from Kristina, so with the cold rainy weather we have here today, it was a perfect time to have a go at this week's challenge. Here are the colours: Certain Celery, Soft Sky, Pumpkin Pie & Very Vanilla.

And this is my card using a new set, soon to be released, True Friend. Makeesha has kindly let me borrow this one for a few days. Hey Keesh, thanks!!!

All images © Stampin'Up 1990-2008

Thursday 17 July 2008

Sneak Peak

A new mini catalogue for Stampin'Up is just around the corner. The Spring Mini is due to be released on August 1 and go thru to November 30. As a demonstrator, I get the opportunity to be one of the first to see all the new products by being able to pre-order for the month of July. This 'mini' is full of fun stamps, bright colours, new Designer papers, rub-on's and exciting accessories. If you would love to have a copy of the new Spring Mini, be sure to send me an email and I will mail a copy out to you. I have a nice pile ready for posting!!

So I thought I'd give you all a sneak peak at a few of the fun products that will be coming up.


This is a little project I was working on yesterday. The 'love notes' are such a fun size to work with; I've made my own this time - (cut cardstock to 15cm x 8cm and score in half) with a variation to the 'love notes box'. Tart & Tangy is the name of this stamp set and it will be a great little set to have for summer. It co-ordinates well with the Summer Picnic DP, as you can see above. And if you love your SU punches as I do, then it's a set for you as it works well with the circle and scallop punches as shown in the cards.
If you would like to make this little box, the template can be found here:

http://laurenstampercat.typepad.com/

If you scroll down a little way, you will see templates/patterns on left hand side of blog. From here you can open a file for this box. I have varied my box a little to suit my project!!

Stamp sets: Tart & Tangy (new spring mini), Family Phrases (sentiments), Cause for Celebration (flower on box)


All images © Stampin'Up 1990-2008

Monday 14 July 2008

Blog Award!!!

Wow, an award for my blog. I got a nice email from Keesh to say she had nominated my blog for this award. Thank you so much Keesh!! A nice surprise.


If you have not seen Makeesha's blog at Stamp your art out, then you just have to see it. Her work is amazing, she is constantly updating her blog with new idea's and card samples, not to mention that she is my inspiring upline and wonderful friend.
The idea of this award is that I also nominate five blogs that inspire me. This is hard as I read so many different blogs, some Stampin'Up & Scrapbooking, others from friends who inspire me with their journey thru life. They are all just wonderful.

Sunday 13 July 2008

Pick-a-Petal & Buttons

Pick-a-Petal is one set I haven't really used much, even though it was one of the first sets I wanted from this years catalogue. So when I saw a card challenge to use buttons at Melissa's Stamping Blog -
http://melhanlon.blogspot.com/ I thought this would be a great set to use.

So here is my card. The petals have been stamped onto DP Berry Bliss with Pretty in Pink ink. I've cut these out and arrange onto the Cocoa cardstock. I've stamped a centre for the flower from the same set, attached a clear button and finished off with the pink ribbon thru the button holes.
On the Cocoa cardstock, I've picked a flower to stamp in the same colour ink. Then with a small punch, I've punched out small circles from Cocoa cardstock for the centre of flower.
Card has been completed with sentiment from Warm Words and some paper piercing.


Card Recipe:
Stamp set: Pick a Petal, Warm Words
Cardstock: Purely Pomegrante, Choc Chip, Close to Cocoa, DP Berry Bliss
Ink: Pretty in Pink, Close to Cocoa
Accessories: Striped ribbon, Clear Button, Pink Tafetta ribbon, Circle punch, Mat pack
All images © Stampin'Up 1990-2008

Saturday 12 July 2008

Emerging Colour Technique

I've had the afternoon to myself, as Warren as taken the boys boat fishing. I know, you probably think, 'going fishing in this cold rainy weather'. But it's actually perfect weather for fishing - no wind, the sea is flat and the sun is shining. So I hope they are having fun and make a big catch!!
Anyway, I've been making a card. After doing lots of scrapbooking this week, a card was a nice change. Since seeing a few cards using the Emerging Colour Technique, I've always wanted to try it myself. After reading some tutorials and figuring it all out, I've made this card. Quite pleased with the end result. It looks hard, but once you give it a go, you will find it's quite easy to achieve.

Here are some basic steps for this technique:

1. On to Whisper White cardstock, stamp some images. I've chosen a few from the Priceless stamp set and stamped in Soft Sky, Regal Rose & Close to Cocoa.

2. Choose a solid stamp and ink up in Versamark. Stamp this image onto the Whisper White cardstock, over the top of the images you've already stamped. I've used the large flower stamp from Office Accourtrement.

3. Sprinkle clear embossing powder over Versamark image and then heat-set with heat gun.

4. Next, with your brayer and a coloured ink pad, roll ink over the entire image done in Versamark. I've used Purely Pomegrante as it makes the image stand out. Then you can cut around the edges of your flower, ready to assemble onto your card.

I hope this makes sense. If you have any questions, leave a comment so I can help you out.

Card Recipe:
Stamp set: Priceless, Short & Sweet, Office Accourtrement
Cardstock: Purely Pomegrante, Close to Cocoa, Sky Blue, Whisper White
Ink: Purely Pomegrante, Close to Cocoa, Sky Blue
Accessories: Ribbon, White gel pen, Word window punch, Silver brad, Dimensionals.

All images © Stampin'Up 1990-2008

Wednesday 9 July 2008

School holiday fun!

School holidays have been great so far. Sleeping in, hanging out with the kids and just relaxing. Thought I'd share some photo's from today. We took the kids to the Archery Park, just five minutes from our house. Everyday, we pass this place when going to the bus; so we promised the boys to treat them during the school holidays. There's archery, mini golf and mini cars. Today we just did the archery and mini cars. We were quite impressed with how quickly the boys picked up archery skills and they were very proud when hitting the target. Kyle came away with a win for the day after going thru seven targets. Well done!!! If your down this way, it's a great place to take the kids and have some family fun.


Friday 4 July 2008

Pockets full of surprises.

Pockets full of surprises is usually what I get when I do my washing - especially with three boys!! But today, I've made pocket cards which you can use for so many different things. I find myself going back to this design of card, again and again. They are so fun and versatile as you will see below.


These ones hold chocolate treats, just the right size for your favourite chocolate bar. The colours are: Groovy Guava, Purely Pomegranate, Wild Wasabi & Certain Celery.
And the stamps are from Garden Whimsy, one of my favourites.
For something a little different, I've 'rock'n'rolled' the butterfly stamp onto vellum and then layered onto Pomegranate cardstock. Have also hi-lighted with glitter.

This pocket card is one I designed a few months back for my upline's monthly demo get-together. I've used the lovely In-Colours: Groovy Guava, Sky Blue & Purely Pomegrante together with Baroque Motifs stamp set and swirly wheel stamp. Inside the pocket is a little 'love note' card, in matching colours.


This pocket is made with an A4 sheet of Kraft colour cardstock. It's designed the same way, but just larger. I've made this so I can fit a cute little gift inside. That's the beauty of this design, you can customize the size for your project.
The stamps are from 'Cause for Celebration' (hostess set).
To make it into a gift bag, I've punched out some small holes in the top and attached some ribbon as handles. Really pleased with this one!!
(The ribbons for this one are non-Stampin'Up)
I think this will be my last post for a little while. School holidays is about to start, we have visitors tommorow and next week, we are hoping to have some family time. I'm sure I'll have a bit of time to squeeze in at my craft desk (don't think I could stay away for too long), so there's sure to be a post or two; but not everyday.

All images © Stampin'Up 1990-2008

Thursday 3 July 2008

Scrapbooking on Canvas

I really wanted this photo to be on the walls of my craft room. So instead of just putting it into a frame, I decided to dress up this small canvas I had in my stash. So with a few pieces of coloured cardstock, some chipboard letters, rub-on's and a few smaller embellishments, I created this cute little wall hanging.
The chipboard letters have been inked up in Real Red and then I've applied Versamark and Clear Embossing Powder to give it some shine.
The smile definition is a rub-on and the little ladybird in the Hodgepodge Hardware frame is from Garden Whimsy. I've also used the photo corner punch and some brads to make an embellisment for the corner of photo.
Some products are Stampin'Up, others are bits and pieces I've collected along the way. It's always fun to do something 'off the page'. And I love it that I'll be able to see it everyday.


Wednesday 2 July 2008

Colour Inspiration #14 - K Werner

It's time for another colour inspiration from Kristina Werner. Each time a new one comes up, it reminds me how fast the weeks are flying by. We are half way the year...... already!!
Anyway, the colours are: Basic Black, Basic Grey, Going Grey, Ruby Red & River Rock. I've chosen to omit River Rock for this one. But I really love the Basic Grey!!

So here is my card - a simple one for this week. I've used Baroque Motifs.
Base card is Going Grey, then Basic Black and then Basic Grey in textured cardstock. I've used my square punch for the motif, layered onto Ruby Red, then Basic Black, finished off with a bling brad! Swirly stamp is in Basic Grey Ink, sentiment is Whisper White ink and card has been completed with Taffeta ribbon.


All images © Stampin'Up 1990-2008


school @ home

Hello, I definitely wanted to record this little moment!  School @ home due to stay at home restrictions because of COVID-19.  It was certai...